Accessing resources remotely without cumbersome jumpboxes and dealing with restrictive red tape has been a recurring challenge for many. In this blog post, I will introduce a method to seamlessly extend your Wide Area Network (WAN) to the cloud and open inbound ports to a network within a firewall that you don’t control.
Step 1: Setting Up the OpenVPN Server in the Cloud: To begin, set up a server in the cloud, preferably running Debian, to host your OpenVPN server. A comprehensive guide can be found here: [Link to DigitalOcean tutorial].
Step 2: Configure pfSense to Connect to OpenVPN: Next, configure your firewall (in this case, pfSense) to establish an “always on” tunnel with the OpenVPN server. Refer to this resource for assistance: [Link to SubnetZero tutorial].
Step 3: Fine-tune ufw and Enable IP Forwarding: Ensure that you have properly copied the certificates and configurations from the pfSense to the OpenVPN server. For good results, consider using UDP port 443. After successfully connecting the VPN, verify that IP forwarding is enabled on the server. Additionally, enable the Uncomplicated Firewall (ufw) on the OpenVPN server and allow the required ports.
ufw allow 443/tcp
ufw allow 3389/tcp
ufw allow 222/tcp
... (other required ports)
Step 4: Modify /etc/ufw/before.rules: This is where the magic happens. Modify the /etc/ufw/before.rules file with the appropriate port forwarding rules similar to the ones below:
*nat
:POSTROUTING ACCEPT [0:0]

# NAT to the OpenVPN tunnel IP
-A PREROUTING -i eth0 -p tcp -m tcp --dport 3389 -j DNAT --to-destination 10.8.0.6:3389
-A PREROUTING -i eth0 -p tcp -m tcp --dport 8000 -j DNAT --to-destination 10.8.0.6:8000
... (other port mappings)
COMMIT
Step 5: Add Forwarding Rules: Add forwarding rules to the bottom of the file to allow traffic to the OpenVPN client.
-A FORWARD -d 10.8.0.6/32 -p tcp -m tcp --dport 3389 -m state --state NEW,RELATED,ESTABLISHED -j ACCEPT
-A FORWARD -d 10.8.0.6/32 -p tcp -m tcp --dport 8000 -m state --state NEW,RELATED,ESTABLISHED -j ACCEPT
... (other forwarding rules)
Step 6: Script for Reboot: For convenience, create a script like the one below to run on reboot:
#!/bin/bash
iptables -A FORWARD -m state --state RELATED,ESTABLISHED -j ACCEPT
iptables -A FORWARD -s 10.8.0.0/24 -j ACCEPT
iptables -A FORWARD -j REJECT
iptables -t nat -A POSTROUTING -s 10.8.0.0/24 -o eth0 -j MASQUERADE
---
OR
Add this to the top of ufw before.rules
# START OPENVPN RULES
# NAT table rules
*nat
:POSTROUTING ACCEPT [0:0]
# Allow traffic from OpenVPN client to eth0 (change to the interface your system uses)
-A POSTROUTING -s 10.8.0.0/8 -o eth0 -j MASQUERADE
COMMIT
# END OPENVPN RULES
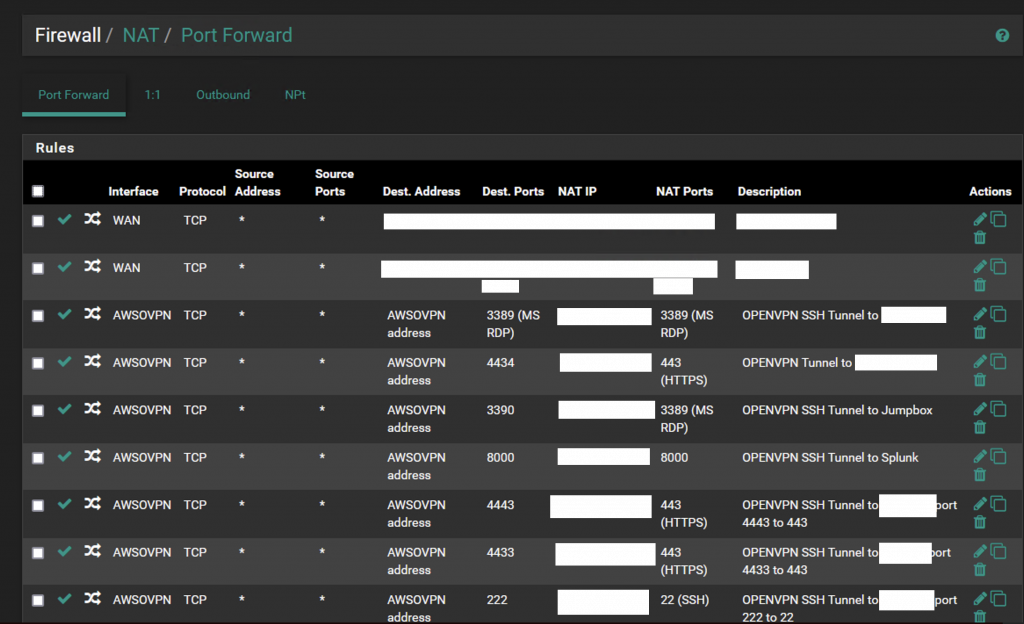
Step 7: Setup pfSense: Here’s a screenshot of some NAT rules
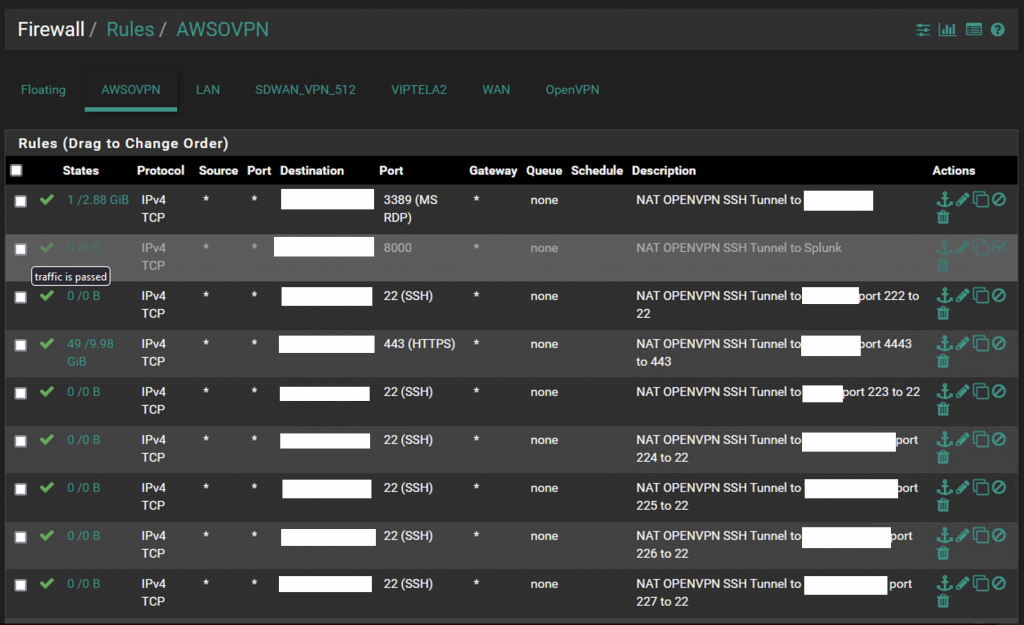
And here’s some firewall rules
Conclusion: By following these steps and ensuring the appropriate NAT and firewall rules are in place, you can enjoy the freedom of accessing resources remotely without the hassle of jumpboxes and restrictive policies. This method not only enhances your WAN capabilities but also opens up new possibilities for seamless and secure remote access.
Please remember that implementing these steps should be done with utmost care and consideration of security measures. Now you can embrace the freedom of remote resource access with confidence and ease. Happy networking!
0 Comments